What's new: 2025.10
Discover all the new Uptempo features introduced with the 2025.10 release, available from October 29, 2025.
For details about bugs that have been fixed this month, see the bug fixes page.
API: Marketing Planner
New endpoints for elements and timelines
We have added new endpoints to the Marketing Planner API that enable bulk actions for elements and timelines. Developers can use these new capabilities to create multiple timelines or elements with a single call, saving time and enabling more efficient integrations with Marketing Planner.
Campaign Management: Activity Configuration
Support for "deny" access control statements
We've expanded the capabilities of the activity access control system in Uptempo Campaign Management to add support for the DENY effect in policy statements. Administrators can use this effect to create policies that explicitly prevent access, allowing for more precision and control when configuring access policies.
More precision, less work: Previously, defining very granular access could often require a large number of very specific ALLOW statements. With the new DENY effect, you can now achieve the same outcome with less effort: grant access broadly with ALLOW, then use the DENY effect to precisely restrict access, reducing the overall number of access control statements you need to design and manage.
Clearer intent and stronger security: Statements with a DENY effect always take priority, even over ALLOW statements with the same scope. This means you can use DENY statements to clearly implement mandatory "never allow" restrictions, and confidently ensure that edge cases are covered.
→ Learn more about access controls for Uptempo Campaign Management
Retire KPIs that are no longer needed
Administrators can now deactivate Key Performance Indicators (KPIs) when they're no longer relevant.
Remove KPIs without losing historical data: Deactivated KPIs are not shown on newly created activities, but remain visible on all previously created activities. This lets you evolve the way you track the performance of activities over time, without losing historical data. And, if you decide to start tracking a retired KPI again later, you can reactivate it at any time.
Additional new capabilities for managing KPIs: To help administrators more easily manage their KPIs, it's now possible to change the display order of KPIs, and there is also a new search function to make it easier to find specific KPIs in the list.
Track revenue for individual funnel stages in Impact Modeler
In the Impact Modeler, you can now track revenue for each funnel stage to get more insights into the pipeline created by your lead generation.
Set up stage-specific revenue tracking: Administrators can turn on revenue tracking for any stage in the funnel, and set a custom label for any stage's revenue (such as "Pipeline", "Bookings", etc.).
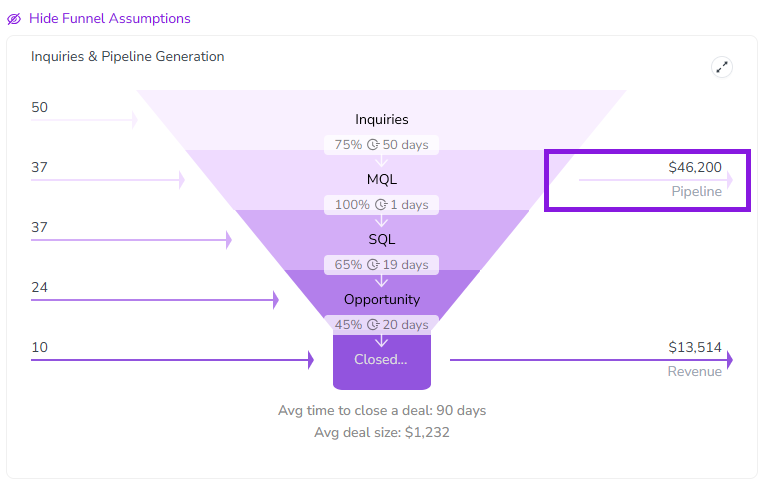
View revenue for a funnel stage: When revenue tracking is turned on for a funnel stage, stage-specific revenue is reflected in the Impact section of each activity's details panel:
Planned tab: The funnel chart (under Show Funnel Assumptions) shows revenue projections (and the custom revenue labels) for each stage where they are enabled, in addition to the existing projection shown on the final stage:
Actual tab: The input table for actuals now features columns (also using the custom revenue labels, and marked with the relevant currency symbol) where you can enter stage-specific revenue.
→ Learn more about how to set up revenue-tracking per funnel stage in the Impact Modeler
Campaign Management: Activities
Save Summary column configurations as presets
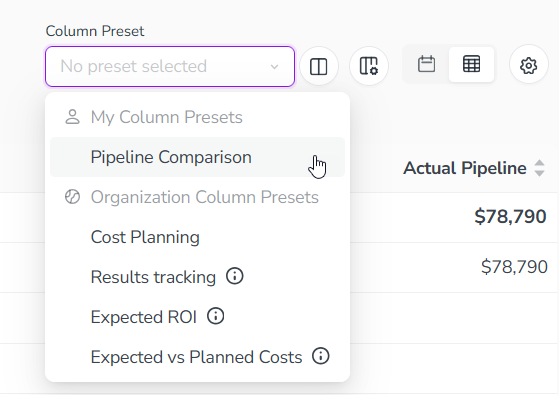
You can now save your custom column configurations in the Summary display mode as presets, so you can quickly apply them again at any time.
Set up column presets for different tasks: With column presets, you don’t have to manually adjust the Summary table's columns every time you want to view different data. You can now create custom column setups tailored to your needs at each stage of the planning and execution cycle, and switch between them instantly with a single click. Plus, you can optionally link column presets to views, so that the right data columns are automatically displayed when you select a view.
Create and manage shared presets for your organization: As an administrator, you can also create column presets that are available to all Uptempo Campaign Management users in your organization, and conveniently manage them in one place.
→ Learn more about how to use column presets in the Summary display mode
Redesigned Activities toolbar
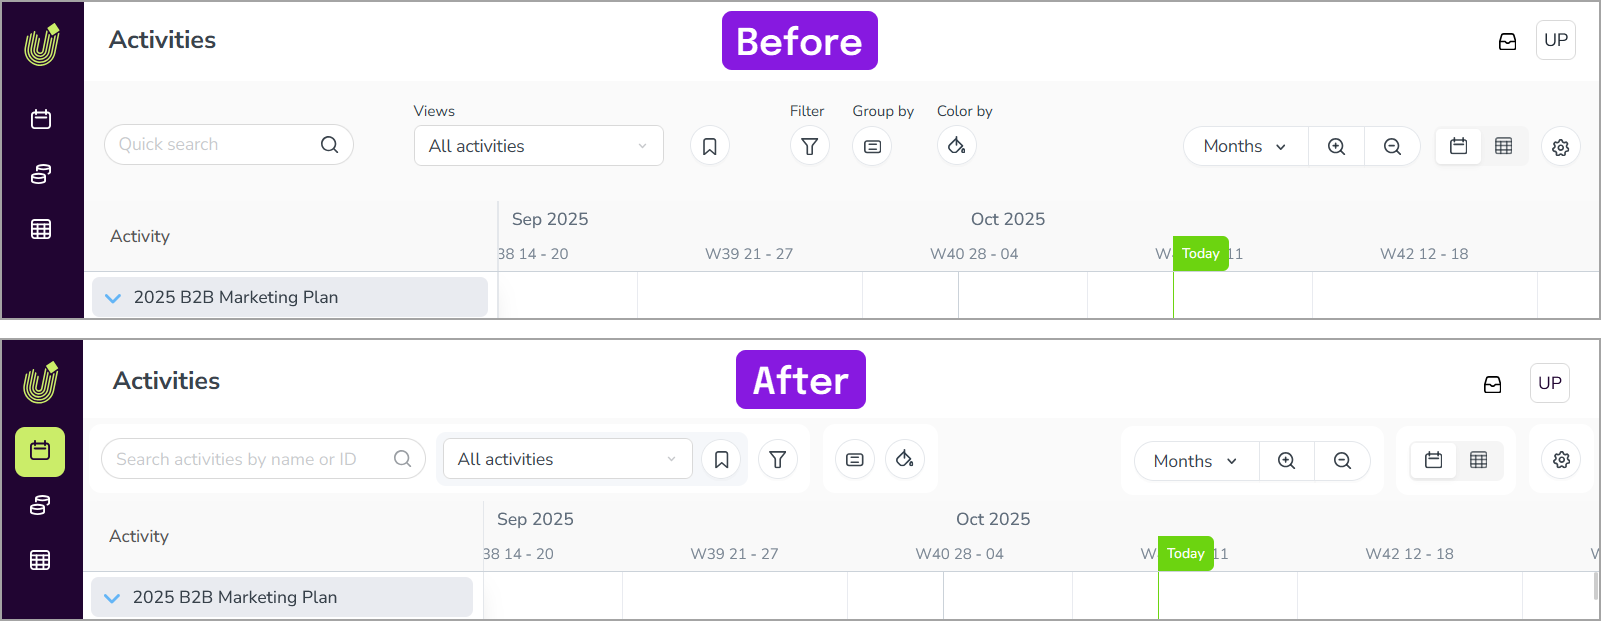
We have redesigned the toolbar in the Activities section to make it work better on the most commonly used display sizes.
Streamlined for usability: We tweaked the toolbar's design so that it takes up less space on the most common laptop and desktop display sizes, leaving more room for activity data. The text labels that appeared over some controls have been removed — instead, clearer and more consistent tooltip labels now appear when you hover on any button. Plus, the icons for some of the buttons have been updated to make their functions more intuitive.
Grouping of functions: The toolbar controls are now visually grouped to indicate their relationships and functions. There is now a stronger visual link between controls that are related to the same function (such as the Select View menu and the View Options button). Sets of controls are now also thematically grouped based on whether they change the data that's displayed (search, filtering, etc.), add context to the visible data (grouping, color-coding, etc.), or apply only to the current display mode (for example column configuration in Summary or zoom in Timeline).
Improved workflow for deleting activities with connected investments
We have improved the way Campaign Management handles deleting activities with connected Financial Management investments to help prevent situations where investments are left unintentionally disconnected.
Warning for connected investments: Whenever an activity with connected investments is deleted, Campaign Management now shows a warning dialog that lists the investments that will be disconnected as a result. To prevent accidental disconnection, users must explicitly confirm each investment to be disconnected before they can delete the activity.
Copy a list of disconnected investments: To make it easier to reallocate the investments left disconnected after an activity is deleted, the warning dialog provides an option to copy the list of affected investments to the clipboard — users can simply paste the list into any text editing app for later reference.
Color-code activities on the Timeline
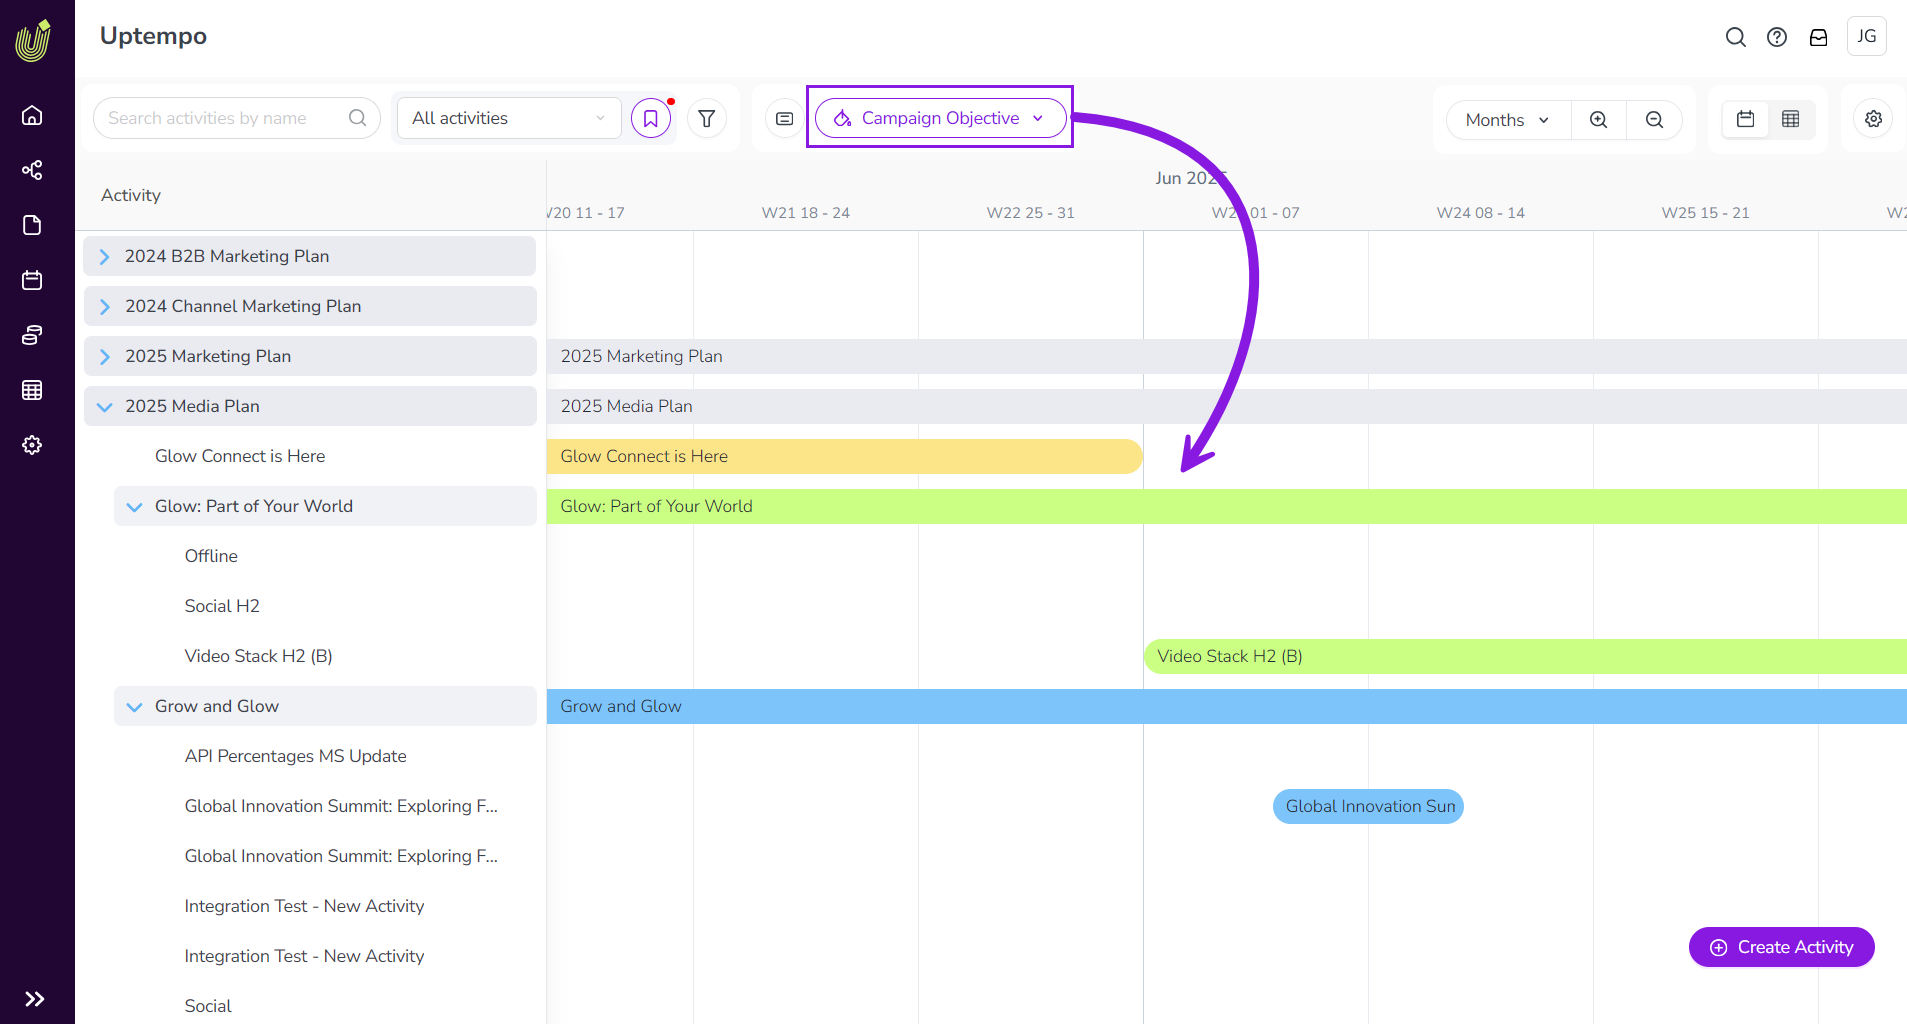
In the Timeline display mode, you can now color-code the activity bars to visually identify activities.
Set up color-coding for attributes: Administrators can configure color-coding on any Drop-Down List attribute by assigning a color to each attribute option.
Display Timeline activities with color-coding: On the Timeline, you can use the new Select Color-Coding toolbar option to select an attribute, and the activity bars are color-coded according to the attribute list option set on each activity. Color-coding helps to visually declutter the Timeline, and makes it easier to interpret the visible activities at a glance.
→ Learn more about how to set up and use color-coding by attribute on the Timeline
Connect multiple investments to an activity in a single step
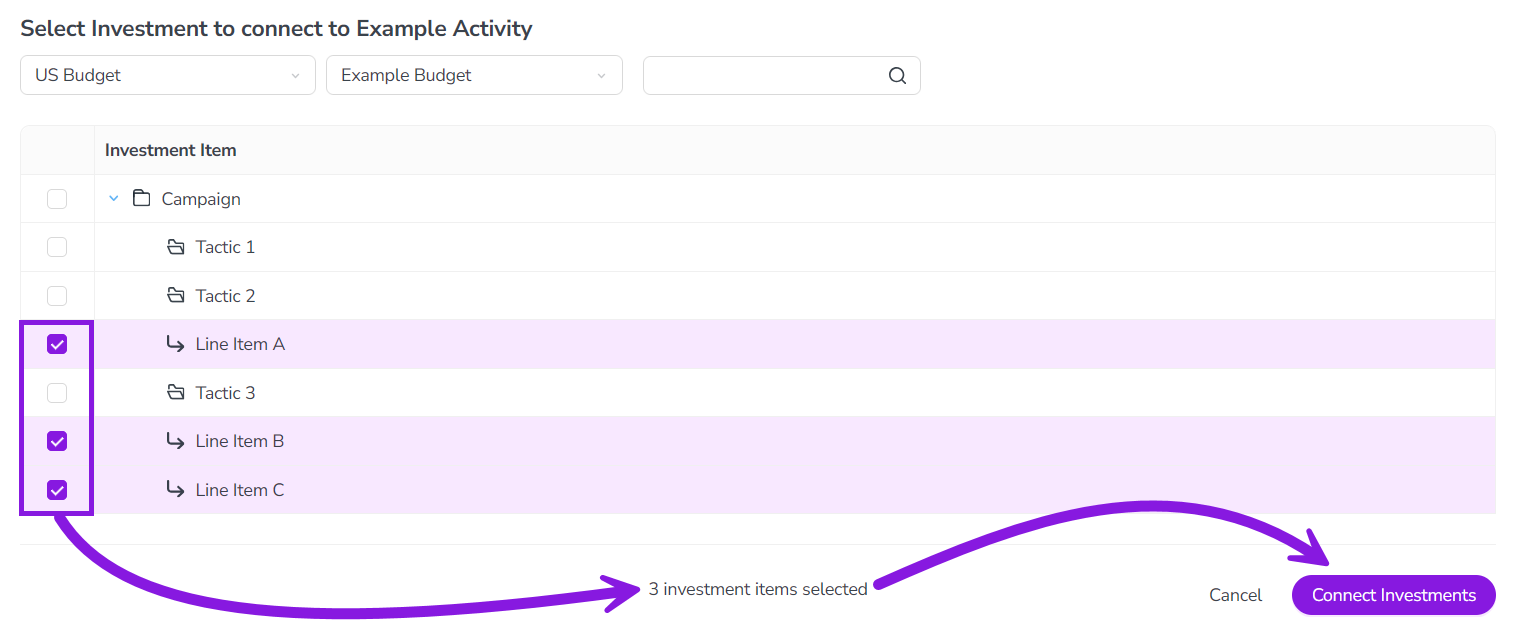
When you connect investments to an activity from the Campaign Management side, you can now select multiple investments and connect them all to the activity with just one click.
The redesigned investment picker lets you select multiple investments to connect at once, saving you time and effort. You can even select investments across different plans and budgets, as the picker will remember all existing selections when you change the plan or budget you're viewing.
Work: Assets
Support for Fusion UX Logic custom web components in asset details
We've expanded support for Fusion UX Logic to Assets (formerly Media Pool), enabling you to add custom web components to the asset details view.
This new capability allows developers to create a new tab in the details view of all assets that displays a custom web component. You can use this feature to integrate relevant information from external systems (such as an asset's publication history) into the Assets user interface, putting it conveniently at your users' fingertips.
→ Learn more about integrating custom components into Uptempo Work with Fusion UX Logic
Work: Planner
Enhancements to the element watch feature
Getting updates about changes to your marketing plan is now easier and more convenient with more options for watching elements:
Watch an element from the context menu: Previously, you had to open an element's details page to watch it and receive update notifications. Now, you can quickly watch any element from its context menu: just right-click on an element in the Calendar or Budget views, then click Watch.
Watch multiple elements with one click: Watching multiple elements is now also faster with a new bulk action. After you have selected multiple elements in the Calendar or Budget view, you can now right-click on the selected elements and click Watch to add all the selected elements to your watch list at once.
Support for sharing sorted views
We've added support for sorted views when sharing a link to an element in Planner.
Previously, if you were using a sorted view in the Calendar or Budget views, following a link to an element would reset the view to the Default View setting to highlight the linked element. Now, sorted views work with links to elements: if you open a link to an element while a sorted view is applied, the system will keep the sorted view active, and will highlight the first (topmost) instance of the linked element in the view.
More precision and options for exchange rates
You now have even more control over exchange rates in Planner with new enhancements to the exchange rates settings (in Planner > Settings > Exchange Rates):
Support for more precise exchange rates: When setting exchange rates in Planner, you can now enter rates with up to 9 decimal places (up from 4 previously), allowing for much greater precision in converted amounts.
Automatically apply an edited rate to other months: When you edit the exchange rate for a particular month, you can now also apply the changed rate to other months at the same time, so you don't need to edit the other months manually. The Edit exchange rate dialog now has two new options that you can use to apply the new exchange rate to all remaining months in the same year, or retroactively to all months in previous years (or both). As before, the edited exchange rate will apply only to the selected month if you do not select either of these new options.
Exchange rate month selection now defaults to FY starting month: On the Exchange Rates settings page, the month selection menu now defaults to the starting month of your fiscal year that was configured during your instance setup (instead of defaulting to January).